Exposing Services using Cloudflare Tunnels

Hello all,
It's been a while since my last post. Work and life have eaten up a good chunk of my time recently, but luckily I now have some breathing room to post some new content.
Recently, I have been working on building out a Docker server for some network services I wanted to implement, such as AdGuard and Unbound for local DNS resolution. This led me to investigate methods of exposing services running in my lab and home servers to the internet securely.
After researching various methods, I settled on implementing Cloudflare Tunnels alongside Traefik for the reverse proxy and Authelia for secure authentication.
Cloudflare Tunnels
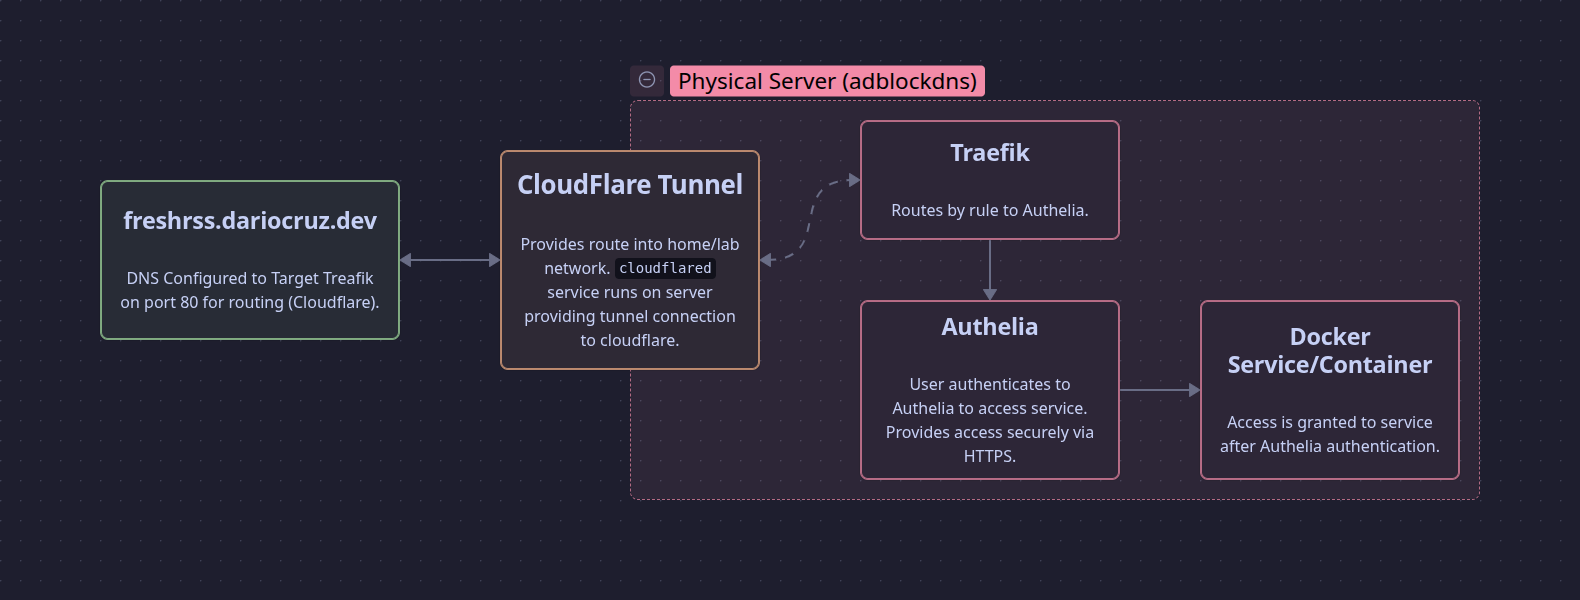
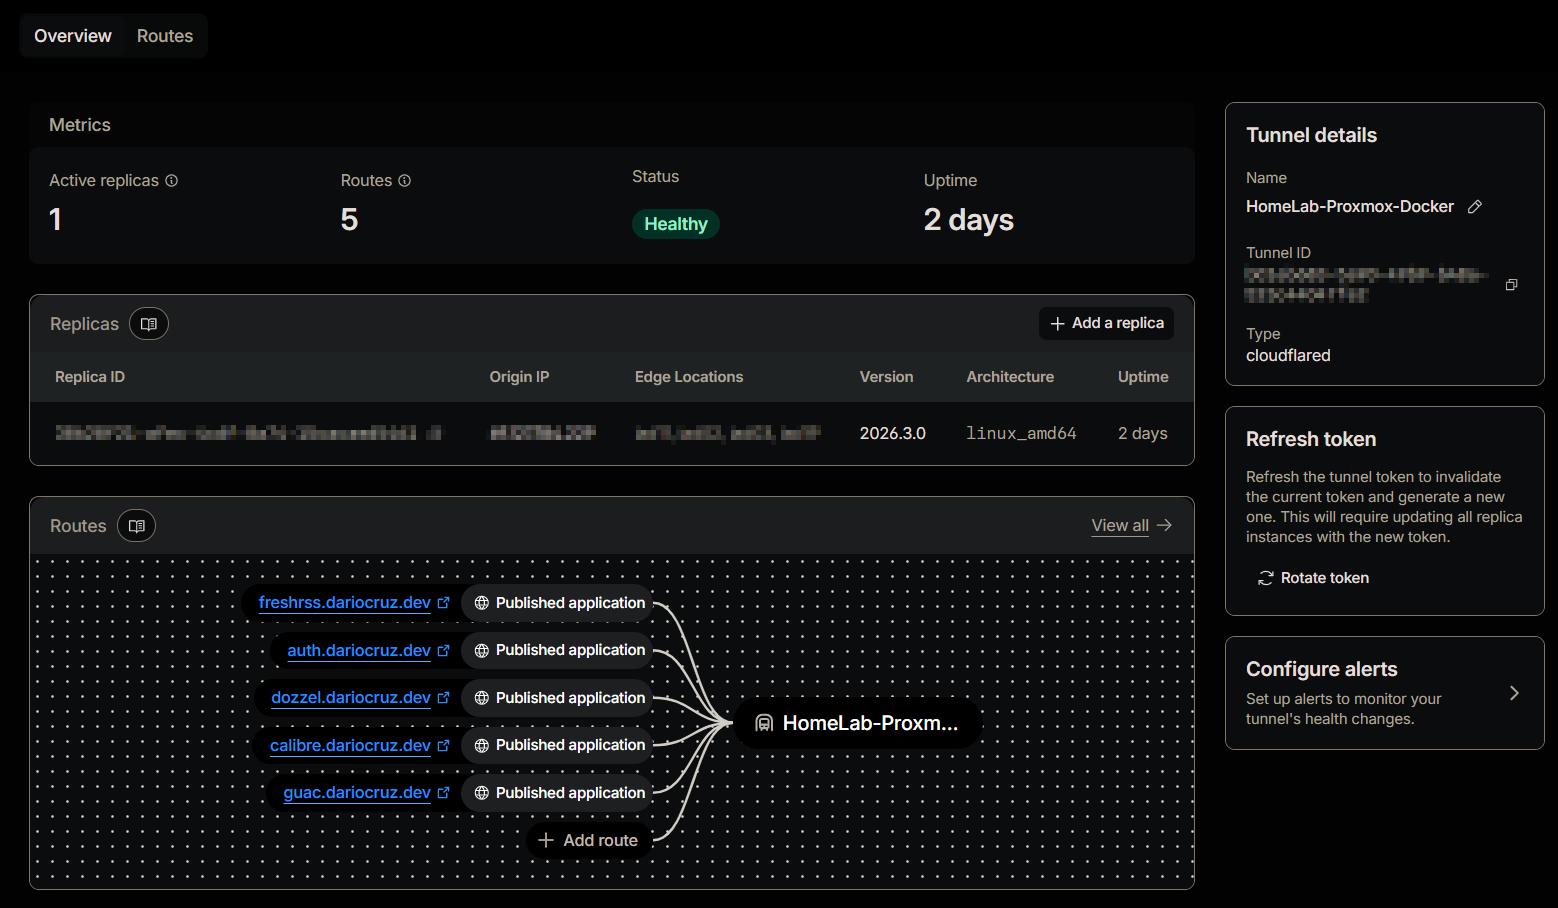
Let's start on the Cloudflare side of things. I moved the DNS for my domain over to Cloudflare to enable tunnel usage. After creating a tunnel for my lab, I created entries and routing for each subdomain. I targeted my Traefik container on port 80, which acts as our reverse proxy and sends requests on to Authelia.
The Proxy-Stack
I set up a basic server running Debian Linux and installed Docker with the intent of using Docker Compose for the setup and deployment of my services. With Docker installed and running, I created a folder called proxy-stack and proceeded to hash out the Docker Compose file.
Here we have the configuration for cloudflared, which is our connector between Cloudflare's distributed, outbound-only reverse proxy network and my local network.
services:
  # Cloudflare tunnels service
  cloudflared:
    image: cloudflare/cloudflared:latest
    container_name: cloudflared
    restart: unless-stopped
    command: tunnel run
    environment:
    # Tunnel token stored in .env file and passed as a variable.
      - TUNNEL_TOKEN=${TUNNEL_TOKEN}
    # Network for all containers in the proxy stack.
    networks:
      - proxy-net
I passed the tunnel token via a .env file. This token is obtained from the Cloudflare dashboard and is specific to the tunnel you created. The command tunnel run initiates the connection to Cloudflare's tunnel servers.
Notice the proxy-net network defined in the YAML file. I defined a specific network so that all components of this reverse proxy can communicate with one another without exposing other containers running on the server.
Traefik provides the local reverse proxy functionality; it makes use of the Docker API for the discovery of containers configured with Traefik labels. I have locked the image to version 3.6 for stability and passed some commands to configure Traefik on startup:
--api.insecure=false- Disables public access to the management GUI.--providers.docker=true- Enables listening to the Docker daemon to automatically spin up routes based on labels.--providers.docker.exposedbydefault=false- Disables routing to every container, scoping it only to those with explicit labels.--entrypoints.web.address=:80- Defines the global entry point for Traefik on port 80 inside the proxy-net network.--entrypoints.web.forwardedHeaders.insecure=true- Enables trusting upstream proxy headers (required when using Cloudflare Tunnels upstream).
  traefik:
    image: traefik:v3.6
    container_name: traefik
    restart: unless-stopped
    command:
      - "--api.insecure=false"
      - "--providers.docker=true"
      - "--providers.docker.exposedbydefault=false"
      - "--entrypoints.web.address=:80"
      - "--entrypoints.web.forwardedHeaders.insecure=true"
    networks:
      - proxy-net
    volumes:
      - /var/run/docker.sock:/var/run/docker.sock:ro
Finally, we have Authelia, our authentication server. I have configured it with labels that define how Traefik should handle connectivity and access:
traefik.http.routers.authelia.rule=Host('auth.dariocruz.dev')- Routes traffic from the subdomain to the Authelia service.traefik.http.middlewares.authelia.forwardauth.address=http://authelia:9091/api/authz/forward-auth- Informs Traefik to forward request validations to Authelia's internal API.traefik.http.middlewares.authelia.forwardauth.trustForwardHeader=true- Enables trusting of upstream headers.traefik.http.middlewares.authelia.forwardauth.authResponseHeaders=Remote-User,Remote-Groups,Remote-Name,Remote-Email- Populates headers upon successful login for SSO functionality.
  authelia:
    image: authelia/authelia:latest
    container_name: authelia
    restart: unless-stopped
    volumes:
      - ./authelia:/config
    networks:
      - proxy-net
    labels:
      - "traefik.enable=true"
      - "traefik.http.routers.authelia.rule=Host('auth.dariocruz.dev')"
      - "traefik.http.routers.authelia.entrypoints=web"
      - "traefik.http.services.authelia.loadbalancer.server.port=9091"
      - "traefik.docker.network=proxy-net"
      - "traefik.http.middlewares.authelia.forwardauth.address=http://authelia:9091/api/authz/forward-auth"
      - "traefik.http.middlewares.authelia.forwardauth.trustForwardHeader=true"
      - "traefik.http.middlewares.authelia.forwardauth.authResponseHeaders=Remote-User,Remote-Groups,Remote-Name,Remote-Email"
How this all works in practice
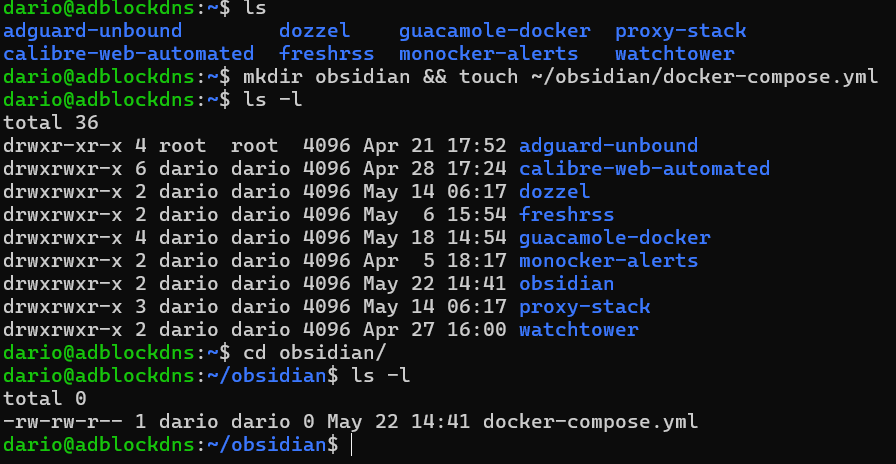
Now that the core stack is running, here is how I set up a new service. Let's deploy Linuxserver/Obsidian, a containerized version of Obsidian.
First, I create a subdirectory and a new Docker Compose file:
In the Compose file below, we put the Obsidian container on the same proxy-net. We enable Traefik via labels, define the subdomain, and reference the Authelia middleware we created earlier.
services:
  obsidian:
    image: lscr.io/linuxserver/obsidian:latest
    container_name: obsidian
    restart: unless-stopped
    security_opt:
      - seccomp:unconfined # Needed for GUI rendering
    environment:
      - PUID=1000
      - PGID=1000
      - TZ=America/New_York
    volumes:
      - ./obsidian/config:/config
    networks:
      - proxy-net
    labels:
      - "traefik.enable=true"
      - "traefik.docker.network=proxy-net"
      - "traefik.http.routers.obsidian.rule=Host('notes.dariocruz.dev')"
      - "traefik.http.routers.obsidian.entrypoints=web"
      - "traefik.http.services.obsidian.loadbalancer.server.port=3000"
      # Reference the Authelia middleware defined in the proxy-stack
      - "traefik.http.routers.obsidian.middlewares=authelia@docker"

networks:
  proxy-net:
    external: true
Next, we update the Authelia configuration file. When Traefik passes traffic to Authelia, Authelia checks its access_control rules. We want to set the policy for our Obsidian service to two_factor to keep our notes secure.
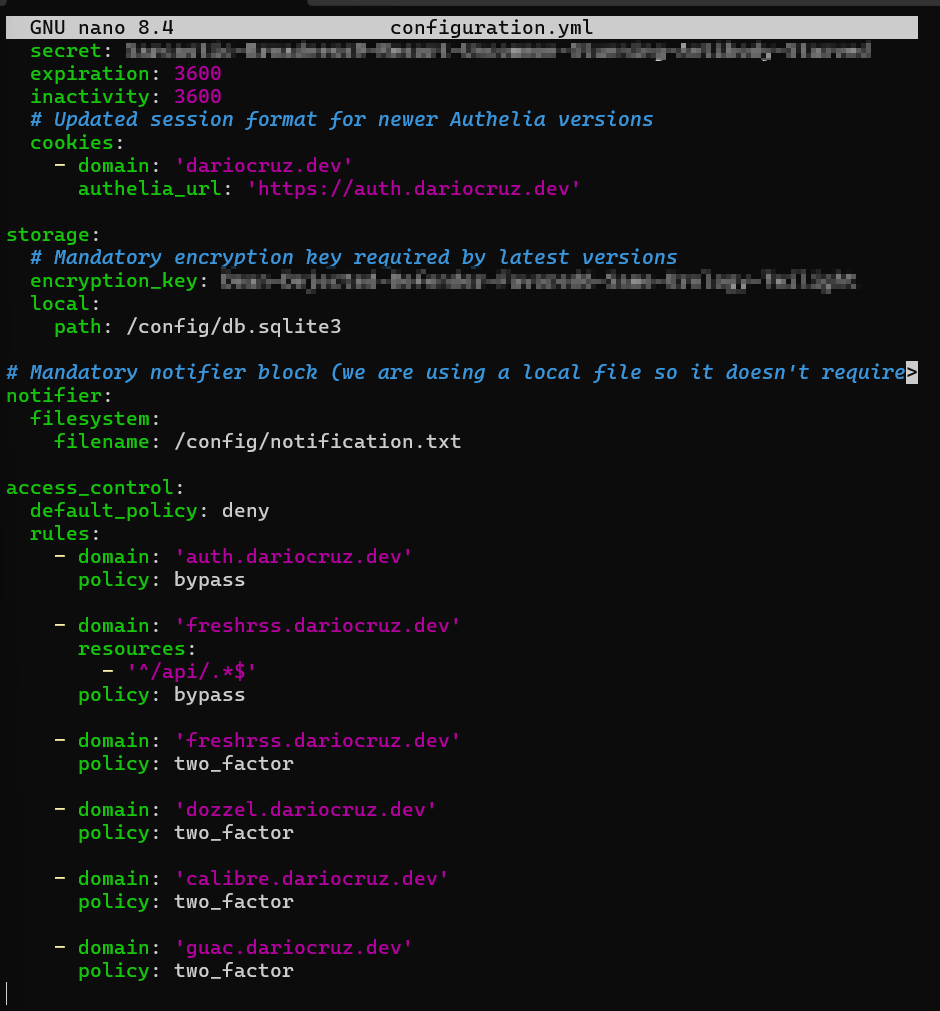
I added the entry for notes.dariocruz.dev at the bottom of the access_control section:

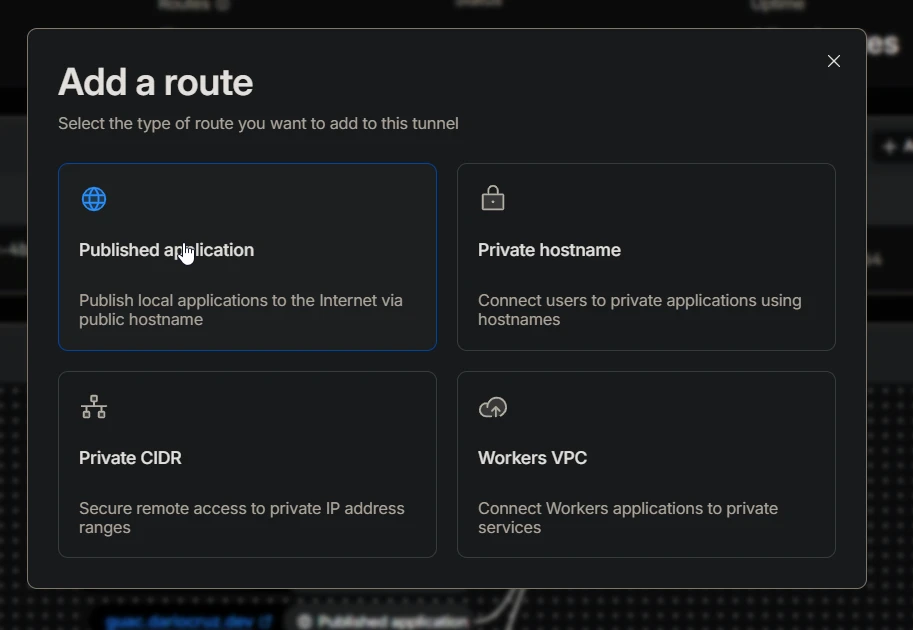
After saving, I restarted the container with docker restart authelia. On the Cloudflare side, I navigated to Networks > Tunnels and added a new public hostname targeting http://traefik:80. Since cloudflared is on the proxy-net, it can reach Traefik directly via its container name.

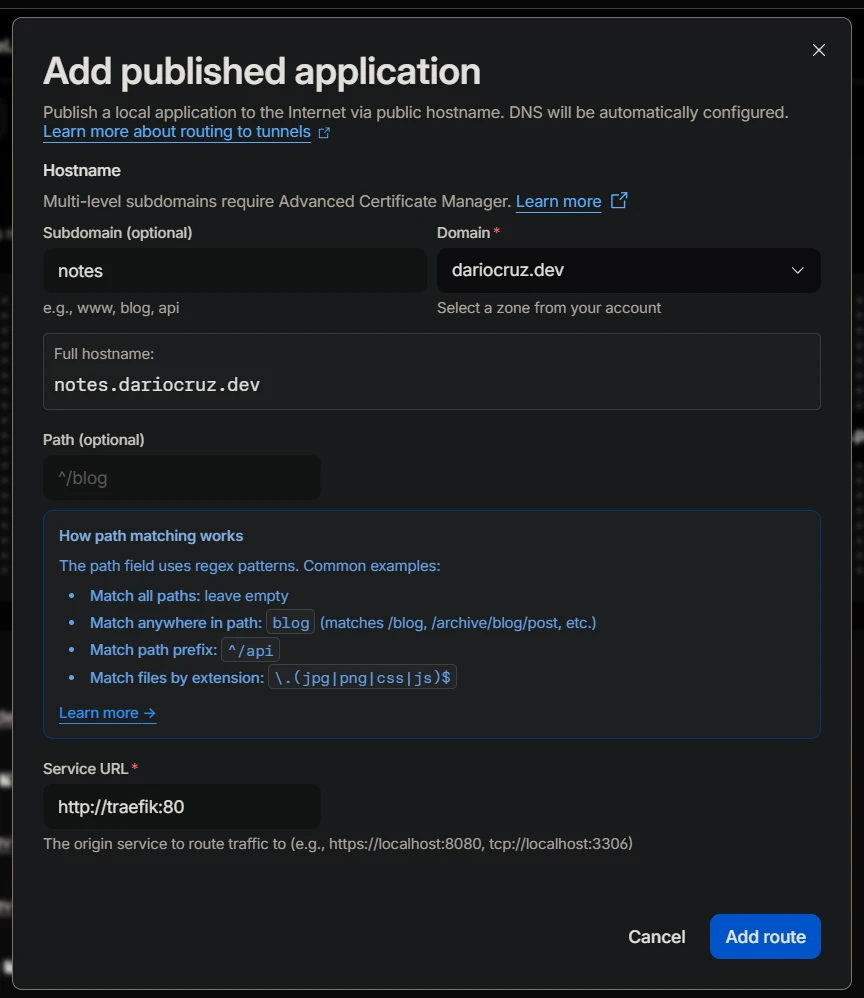
I went ahead and added a new route as a published application.
I then configured the subdomain to use and provided the URL for our Traefik reverse proxy.
Now we can spin up our Obsidian container and test authentication and access.

Now, navigating to notes.dariocruz.dev successfully triggers the Authelia login portal before granting access to Obsidian.

Note: I had to make minor adjustments to the final Docker Compose to handle websocket connections for the GUI rendering; I will post more on that optimization soon.
Final Thoughts
Exposing services via Cloudflare Tunnels is straightforward. Once your DNS is switched over, it's only a matter of targeting your internal services via hostname or IP. With Traefik and Authelia, you gain a robust layer of security that ensures only authorized users can reach your home lab services.