Demystifying Subnetting - From Binary Math to Real-World Cisco IOS Configs


Hello all,
It's been a busy couple of weeks balancing work, lab sessions, and CCNA prep. Lately, I've been spending a ton of time diving deep into Layer 3 network architecture—specifically, IP addressing and subnetting.
Subnetting is easily one of those topics that strikes fear into the hearts of anyone starting out in networking. When I first looked at CIDR notation and binary masks, it felt like trying to decipher matrix code. But once you break down why we divide networks and learn a few clever shortcuts, the lightbulb turns on, and it becomes second nature.
In this post, I want to take you through everything you need to master IPv4 addressing and subnetting—from the core theory and speed-calculation shortcuts to real-world Cisco IOS CLI configurations and troubleshooting gotchas.
The "Why" Before the "How": Why Do We Subnet?
Every IP address tells a story of two distinct parts: the Network portion (which street you live on) and the Host portion (your specific house number). The subnet mask is the definitive line in the sand that separates them.
When you look at a subnet mask in its raw binary form, an unbroken wall of 1s proudly declares the network territory, while the remaining 0s are left open for hosts to claim.
Without this dividing line, a host wouldn't know if a destination IP belongs to a local neighbor on the same switch or a distant server across the globe. When the mask reveals that the destination lives on a completely different network, the host knows it must hand the traffic off to its Default Gateway—the router tasked with navigating between these logical boundaries.
Beyond basic routing, breaking up a massive network into smaller, isolated subnets is critical for three big reasons:
- Security: You can place sensitive servers (like HR or Finance) into their own subnets and enforce strict firewall rules or Access Control Lists (ACLs) between them.
- Performance: Subnets chop up massive broadcast domains. Without subnetting, ARP requests and broadcast noise from thousands of devices would choke your network switches.
- Address Preservation: In a world where the global pool of IPv4 addresses has been entirely exhausted, subnetting ensures we don't waste precious IP space.
IPv4 Addressing Fundamentals
Before we start crunching numbers, we have to look at how IPv4 addresses are classified.
Legacy Classful Addressing
In the early days of the internet, IP addresses were divided into fixed classes based on the value of their first octet:
| Class | First Octet Range | Default Mask | Default CIDR | Purpose |
|---|---|---|---|---|
| Class A | 1 – 126 | 255.0.0.0 | /8 | Massive organizations (16.7M hosts/net) |
| Class B | 128 – 191 | 255.255.0.0 | /16 | Medium/Large organizations (65,534 hosts/net) |
| Class C | 192 – 223 | 255.255.255.0 | /24 | Small organizations (254 hosts/net) |
| Class D | 224 – 239 | N/A | N/A | Multicast Traffic |
| Class E | 240 – 255 | N/A | N/A | Experimental / Reserved |
(Fun fact: 127.x.x.x is missing from Class A because it was set aside specifically for loopback testing!)
RFC 1918 Private IPv4 Ranges
Because public IPv4 addresses were running out fast, RFC 1918 carved out private address blocks for local networks. These IPs are non-routable on the public internet, meaning traffic must pass through NAT (Network Address Translation) at your border router before hitting the web:
- Class A Private Range:
10.0.0.0–10.255.255.255(10.0.0.0/8) - Class B Private Range:
172.16.0.0–172.31.255.255(172.16.0.0/12) - Class C Private Range:
192.168.0.0–192.168.255.255(192.168.0.0/16)
Special-Use IPv4 Addresses
- Loopback (
127.0.0.1): Used by your host machine to send traffic to itself when testing the local TCP/IP stack. - APIPA / Link-Local (
169.254.0.0/16): The dreaded "failed DHCP" range. If Windows or macOS can't reach a DHCP server, it automatically assigns itself an IP in this range. If you see a169.254.x.xon your machine, your network connection is definitely broken!
Traffic Delivery Types: Unicast, Multicast, & Broadcast
How data travels across these subnets depends on the delivery method:
- Unicast (One-to-One): Direct communication from one source host to one destination IP (e.g., SSHing into a router or loading this blog page).
- Broadcast (One-to-All): Traffic sent from one host to everyone on the subnet.
- Limited Broadcast (
255.255.255.255): Broadcasts to all hosts on the local network segment. Routers block these by default so they don't flood the internet. - Directed Broadcast (e.g.,
192.168.10.255): Targeted at all hosts on a specific remote subnet.
- Limited Broadcast (
- Multicast (One-to-Many): Sent to a specific group of subscribed hosts using Class D addresses (
224.0.0.0/4). Protocols like OSPF use224.0.0.5to talk to neighboring routers without bothering every host on the switch.

The Mathematics of Borrowing Bits
So, how do we actually slice up a network block into custom subnets? We become borrowers.
To create smaller subnets, we borrow bits from the host portion (the 0s) and turn them into network bits (the 1s). Shifting that boundary line to the right creates more subnets, but it's a balancing act: every bit you borrow doubles your subnet count, but cuts the available host IPs per subnet in half.
Because we operate in binary, we use the power of two:
- Number of Subnets Created: $2^s$ (where $s$ is the number of bits borrowed).
- Total Addresses per Subnet: $2^h$ (where $h$ is the number of remaining host bits).
The Two Reserved Addresses
Remember: you can never assign all $2^h$ addresses to hosts. In every single subnet, two IP addresses are strictly reserved:
- The Network Address: The very first IP in the range, which identifies the subnet itself (e.g.,
192.168.10.0). - The Broadcast Address: The very last IP in the range, used to send data to all hosts on that subnet (e.g.,
192.168.10.255).
Because of these reservations, our formula for usable hosts per subnet is always:
Usable Hosts = 2h - 2
Dotted Decimal vs. Slash (CIDR) Notation
When reading subnet masks, you'll see them written in two ways: traditional Dotted Decimal (255.255.255.0) or Slash (CIDR) Notation (/24), which simply counts the total number of consecutive network 1s.
Here is a cheat-sheet table of common subnet masks:
| CIDR | Dotted Decimal Mask | Total IP Addresses | Usable Hosts |
|---|---|---|---|
/24 | 255.255.255.0 | 256 | 254 |
/25 | 255.255.255.128 | 128 | 126 |
/26 | 255.255.255.192 | 64 | 62 |
/27 | 255.255.255.224 | 32 | 30 |
/28 | 255.255.255.240 | 16 | 14 |
/29 | 255.255.255.248 | 8 | 6 |
/30 | 255.255.255.252 | 4 | 2 (Ideal for point-to-point links) |
The "Magic Number" Method: Fast Subnetting for Exams & Production
If you're studying for the CCNA (or working in the field), converting IP addresses to binary line-by-line is way too slow. You need a fast mental shortcut. Enter the Magic Number (Block Size) method.
The 4-Step Magic Number Shortcut
-
Identify the "Interesting Octet": Find the octet in the subnet mask that is not
255or0. -
Calculate the Magic Number: Subtract the interesting octet value from
256.Magic Number = 256 - Interesting Octet Value
-
Find the Network ID: Count by multiples of your Magic Number in that interesting octet until you reach or exceed your IP address. The multiple below or equal to your IP is your Network ID!
-
Determine the Broadcast & Usable Range:
- Next Subnet ID: Add the Magic Number to the current Network ID.
- Broadcast Address: One IP less than the next Subnet ID.
- Usable Host Range: Everything between the Network ID and Broadcast Address.
Worked Example:
Say we are given IP 192.168.10.150 with subnet mask 255.255.255.192 (/26):
- Interesting Octet: The 4th octet (
192). - Magic Number: $256 - 192 = 64$.
- Subnet Multiples:
0, 64, 128, 192, 256...- Since
.150falls between128and192, our Network ID is192.168.10.128.
- Since
- Broadcast & Usable Range:
- Next Subnet =
192.168.10.192 - Broadcast Address =
192.168.10.191 - Usable Host Range =
192.168.10.129to192.168.10.190
- Next Subnet =
Boom! In less than 15 seconds, you solved the entire subnet range without touching binary.
VLSM: Variable Length Subnet Masking
Old-school Fixed-Length Subnet Masking (FLSM) forces every subnet to be the exact same size. That's a huge waste of IP space.
Imagine you have a /24 block (192.168.1.0/24, 256 IPs) and you need to supply IP space for:
- Sales LAN: 100 hosts
- HR LAN: 50 hosts
- Router-to-Router Link: 2 hosts
If you use FLSM and slice the network into equal /25 blocks (128 IPs each), you use up your whole /24 on just two subnets, leaving zero space for the router link!
VLSM (Variable Length Subnet Masking) fixes this by letting you customize the mask for each individual subnet based on host requirements.
Golden Rule of VLSM:
Always allocate your subnets starting with the largest host requirement first and work your way down to the smallest!
Let's carve up 192.168.1.0/24:
- Sales LAN (100 hosts needed): We need a mask supporting at least 100 hosts. A
/25gives us 126 usable hosts ($2^7 - 2 = 126$).- Subnet 1:
192.168.1.0/25(Usable Range:192.168.1.1–192.168.1.126)
- Subnet 1:
- HR LAN (50 hosts needed): Starting at the next free IP (
192.168.1.128), we need space for 50 hosts. A/26gives us 62 usable hosts ($2^6 - 2 = 62$).- Subnet 2:
192.168.1.128/26(Usable Range:192.168.1.129–192.168.1.190)
- Subnet 2:
- Router Link (2 hosts needed): Starting at
192.168.1.192, we need just 2 hosts. A/30gives us exactly 2 usable IPs ($2^2 - 2 = 2$).- Subnet 3:
192.168.1.192/30(Usable Range:192.168.1.193–192.168.1.194)
- Subnet 3:
By using VLSM, we satisfied all three network needs and still have 192.168.1.196 through 192.168.1.255 left wide open for future expansion!

Route Summarization (Supernetting)
Route Summarization is the reverse of subnetting. Instead of breaking a large network down into smaller pieces, a router combines multiple contiguous small subnets into one single summary route advertisement.
Why care about summarization?
- Reduces Routing Table Size: Saves router memory and processing power.
- Prevents Route Flapping: If a link drops in an internal subnet, the summary route advertised to external routers stays up, preventing network-wide routing recalculations.
How to Calculate a Summary Route:
Suppose our router has four contiguous subnets it wants to summarize to an upstream router:
172.16.0.0/24172.16.1.0/24172.16.2.0/24172.16.3.0/24
Step 1: Convert the changing octet (the 3rd octet) to binary:
0=000000001=000000012=000000103=00000011
Step 2: Count the matching bits from left to right.
All four numbers share the exact same first 6 bits (000000xx).
Step 3: Add the matching bits to the static octets.
The first two octets (172.16) give us 16 matching bits. Adding the 6 matching bits from the 3rd octet gives us $16 + 6 = 22$ bits.
Summary Route: 172.16.0.0/22 (Subnet Mask: 255.255.252.0). This single summary route replaces all four /24 entries in the neighbor's routing table!

Cisco IOS Configuration Examples
Now that we have the math and theory down, let me put on my engineer hat and show you how this actually looks when configuring Cisco CLI devices in the lab.

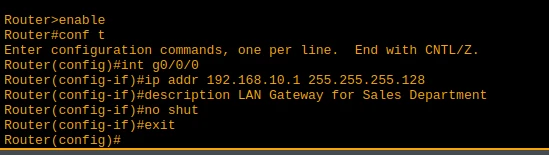
Scenario 1: Standard Router Interface Configuration (L3 Port)
Here, we configure a physical interface on a Cisco router (g0/0) to act as the default gateway for a /25 subnet (192.168.10.0/25).
Router> enable
Router# configure terminal
Router(config)# interface GigabitEthernet0/0
! Assign the first usable IP in the /25 range
Router(config-if)# ip address 192.168.10.1 255.255.255.128
Router(config-if)# description LAN Gateway for Sales Department
! Bring interface out of default shutdown state
Router(config-if)# no shutdown
Router(config-if)# exit
Scenario 2: Router-on-a-Stick (Inter-VLAN Routing with Subinterfaces)
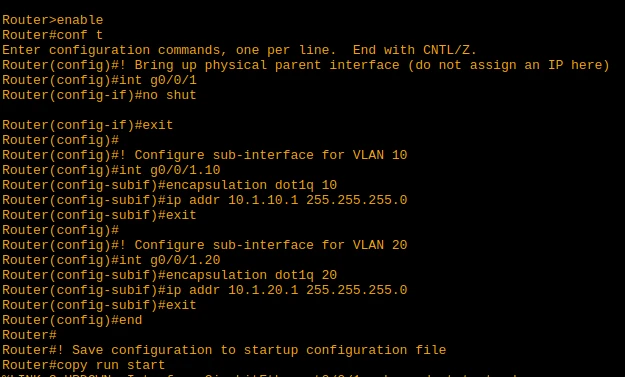
When routing between multiple VLANs over a single physical cable connected to a switch trunk port, we use subinterfaces. Here we route for VLAN 10 (10.1.10.0/24) and VLAN 20 (10.1.20.0/24) on physical interface g0/1.
Router> enable
Router# configure terminal
! Bring up physical parent interface (do not assign an IP here)
Router(config)# interface GigabitEthernet0/1
Router(config-if)# no shutdown
Router(config-if)# exit

! Configure Subinterface for VLAN 10
Router(config)# interface GigabitEthernet0/1.10
Router(config-subif)# encapsulation dot1Q 10
Router(config-subif)# ip address 10.1.10.1 255.255.255.0

! Configure Subinterface for VLAN 20
Router(config)# interface GigabitEthernet0/1.20
Router(config-subif)# encapsulation dot1Q 20
Router(config-subif)# ip address 10.1.20.1 255.255.255.0
Router(config-subif)# end
Router# copy running-config startup-config

Scenario 3: Switch Virtual Interfaces (SVI) on a Layer 3 Switch
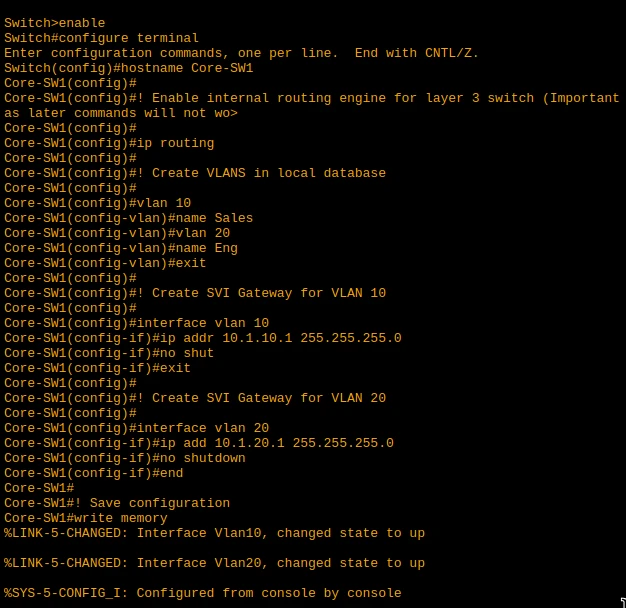
In modern campus networks, inter-VLAN routing is usually handled directly on a Multilayer switch using SVIs. Here is how we configure Core-SW1 to route between VLAN 10 and VLAN 20 internally.
Switch> enable
Switch# configure terminal
Switch(config)# hostname Core-SW1

! Enable the internal routing engine (CRITICAL STEP!)
Core-SW1(config)# ip routing

! Create VLANs in local database
Core-SW1(config)# vlan 10
Core-SW1(config-vlan)# name SALES
Core-SW1(config-vlan)# vlan 20
Core-SW1(config-vlan)# name ENG
Core-SW1(config-vlan)# exit

! Configure SVI Gateway for VLAN 10
Core-SW1(config)# interface vlan 10
Core-SW1(config-if)# ip address 10.1.10.1 255.255.255.0
Core-SW1(config-if)# no shutdown

! Configure SVI Gateway for VLAN 20
Core-SW1(config)# interface vlan 20
Core-SW1(config-if)# ip address 10.1.20.1 255.255.255.0
Core-SW1(config-if)# no shutdown
Core-SW1(config-if)# end
Core-SW1# write memory
Troubleshooting Common Subnet Issues
Even after practicing subnetting for months, it's easy to make mistakes during late-night lab sessions or configuration pushes. Here are the three most common subnetting issues I run into and how to diagnose them:
1. Interface IP Overlap Error
If you try to assign an IP address to an interface that overlaps with an existing active subnet on the router, Cisco IOS will reject it instantly.
- The Error:
% 192.168.1.0 overlaps with GigabitEthernet0/0 - The Fix: Run
show ip interface briefto check active assignments. Double-check your subnet math to make sure you didn't accidentally assign IPs from the same subnet block to two separate interfaces!
2. Subnet Mask Mismatch
If two connected hosts or interfaces have different subnet masks, you'll get weird, intermittent connectivity issues.
- The Symptom: Host-A (
192.168.1.10 /24) can ping Host-B (192.168.1.130 /25), but Host-B cannot ping Host-A back! Why? Host-B has a/25mask, so it thinks any IP above.127lives on a remote network and tries to send the reply to its gateway. Host-A has a/24mask, so it thinks Host-B is local and expects a direct reply. - The Fix: Always verify that every host on the same VLAN or physical switch segment shares the exact same CIDR mask!
3. Off-Subnet Default Gateway
A host must reside in the exact same logical subnet as its Default Gateway router interface.
- The Symptom: Host is configured with IP
192.168.10.50 /26(usable range:.1–.62), but its default gateway is set to192.168.10.65(which belongs to the next/26subnet block). The host will fail to ping anything off-network because it can't resolve ARP for a gateway that lives outside its logical boundaries. - The Fix: Validate host configuration settings. Ensure the gateway IP falls inside the host's usable IP range (usually assigned to the
.1or last usable IP).
Final Thoughts
Subnetting might feel intimidating at first, but once you master the "Magic Number" shortcut and understand how boundaries work in binary, it becomes one of the most rewarding skills in networking. Whether you're setting up a quick /30 link between routers in Packet Tracer or building out an enterprise network with VLSM and SVIs, understanding subnet boundaries is what separates someone who just pastes commands from a true network engineer.
What's next for me? I'm continuing my CCNA study journey, diving deeper into dynamic routing protocols like OSPF and preparing more hands-on lab projects.
How do you approach subnetting calculations? Do you use the Magic Number method or another shortcut? Let me know in the comments or reach out on LinkedIn!