VLANs in Depth - Access Ports, Trunks, and Native VLANs Explained


Hello all,
It's time to dive back into network architecture fundamentals! Between balancing work tasks and setting up lab scenarios in Packet Tracer, I've been spending a ton of time working through the Cisco CCNA 200-301 domains. As I study and lab out these concepts, I want to document what I'm learning, breaking down core networking concepts into practical, hands-on guides.
Let's kick things off with one of the absolute bedrock building blocks of enterprise switching: Virtual Local Area Networks (VLANs).
Mastering VLANs is easily one of the most critical milestones for anyone studying for the CCNA or managing campus networks. It isn't just about memorizing CLI command syntax; it's about deeply understanding how Ethernet frames are tagged, how switches handle traffic across trunk links, and how to write clean configuration lines that prevent network loops and security vulnerabilities.
The "Why" Before the "How": Broadcast Storms and Flat Networks
To understand why we need VLANs, we first have to look at how unconfigured switches behave right out of the box. By default, a switch treats its entire chassis as one single, flat network—meaning every port belongs to the exact same broadcast domain.
When a host needs to communicate with another device but doesn't have its destination MAC address in its ARP cache, it sends out an Address Resolution Protocol (ARP) request. Because ARP is a broadcast frame, the switch is forced to flood that packet out of every single port except the one it arrived on.

As your network grows from a small single office with a few computers into a campus with hundreds of devices, this constant flood of broadcast traffic creates three massive headaches:
- Performance Degradation: Every connected host must stop what it's doing to process every broadcast frame, wasting precious CPU cycles across all desktop machines.
- Security Vulnerabilities: In a flat network, there are no logical barriers. Anyone can plug into an open switch port, sniff broadcast traffic, or launch man-in-the-middle ARP spoofing attacks.
- Lack of Departmental Boundaries: Devices that should be strictly separated (like HR, Finance, Guest Wi-Fi, and Management interfaces) all sit in the exact same broadcast space.
VLANs solve this problem by logically segmenting a single physical switch into multiple, isolated broadcast domains. When you assign switch ports to a VLAN, you're telling the switch's internal ASIC that broadcast traffic in VLAN 10 must never leak into VLAN 20—effectively slicing one physical switch into multiple virtual switches!
Access Ports: The Building Blocks of VLANs
An Access Port is a physical switch interface configured to belong to exactly one specific VLAN. Access ports are meant for connecting end devices—like PC workstations, network printers, IP phones, and servers.
The best part? End devices are completely unaware that VLANs even exist. When your laptop sends a standard Ethernet frame, it has no VLAN tag attached to it. The switch receives this untagged frame on an access port, checks the port's assigned VLAN ID in memory, and forwards the frame only to other switch ports operating inside that exact same VLAN.
Configuring Access Ports in Cisco IOS
Configuring an access port in Cisco IOS requires two basic steps: creating the VLAN entry globally in the switch database, and binding the physical port to that VLAN.
Here is the exact CLI sequence I use in the lab:
! Step 1: Create and name the VLAN globally
Switch# configure terminal
Switch(config)# vlan 10
Switch(config-vlan)# name Finance
Switch(config-vlan)# exit

! Step 2: Bind the physical interface to the VLAN
Switch(config)# interface FastEthernet 0/6
Switch(config-if)# switchport mode access
Switch(config-if)# switchport access vlan 10
Switch(config-if)# end
Let's break down what each line is doing under the hood:
vlan 10: Creates the database entry for VLAN 10. (Pro-tip: If you assign a port to a VLAN that doesn't exist yet, IOS will auto-create it, but it's best practice to manually create and name your VLANs first for easy documentation!)switchport mode access: Explicitly locks the port into access mode. This is a critical security step because it prevents the port from dynamically negotiating a trunk link if an attacker plugs in a rogue switch.switchport access vlan 10: Binds physical interfaceFa0/6directly to VLAN 10.
Verifying Access Port Assignments
Whenever you push configuration changes in the lab, your immediate next step should be verification. The most essential command for inspecting VLAN state is:
Switch# show vlan brief
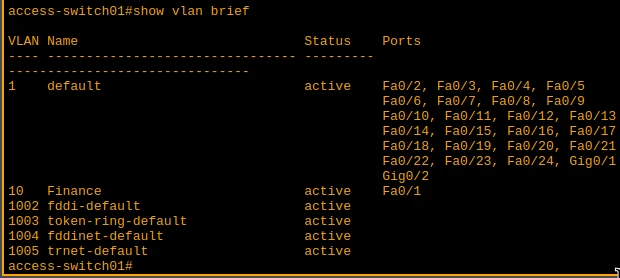
This output displays a clean summary table listing all active VLAN IDs, their descriptive names, and every physical port bound to them. Always run this command to verify your ports landed in the right VLAN before moving on!
Trunk Ports: Crossing Switch Boundaries
Access ports work great when all your users plug into a single switch. But what happens when your company expands across multiple floors or buildings, and Finance users on Switch A need to communicate with Finance users on Switch B?
If we only relied on access ports, we would have to run a dedicated physical patch cable between the two switches for every single VLAN on the network! If you have 15 VLANs, you'd waste 15 physical ports on each switch just for uplinks. That gets expensive and unmanageable fast.
This is where Trunk Ports come in. A trunk port is a high-speed point-to-point link between two switches (or between a switch and a router) configured to carry traffic for multiple VLANs simultaneously over a single physical cable.
How It Works: IEEE 802.1Q Frame Tagging
To transport traffic for dozens of subnets over one wire without mixing them up, switches use the industry-standard IEEE 802.1Q (commonly called Dot1Q) protocol.

Here is the step-by-step lifecycle of a frame crossing a Dot1Q trunk link:
- Ingress Reading & Egress Tagging: When Switch A receives an untagged frame on an access port in VLAN 10 and needs to send it across the trunk to Switch B, it inserts a 4-byte 802.1Q header (tag) directly into the Ethernet frame. This header includes the
TPID (0x8100)and the 12-bit VLAN ID (10). - Trunk Transmission: The frame travels across the physical trunk link carrying its 802.1Q tag intact.
- Tag Reading & Stripping: Switch B receives the frame on its trunk port, reads the VLAN ID tag, and identifies it as VLAN 10 traffic. Before forwarding the frame out to the destination PC's access port, Switch B strips the 802.1Q tag off completely. The destination laptop receives a standard, untagged Ethernet frame!
Configuring Trunk Ports in Cisco IOS
Here is how we configure a physical interface (Gi0/1) to operate as an 802.1Q trunk link:
Switch# configure terminal
Switch(config)# interface GigabitEthernet 0/1
Switch(config-if)# description Uplink to Core-SW2
Switch(config-if)# switchport trunk encapsulation dot1q
Switch(config-if)# switchport mode trunk
Switch(config-if)# switchport trunk allowed vlan 10,20,30
Switch(config-if)# end
Key configuration notes:
switchport trunk encapsulation dot1q: Defines 802.1Q as the encapsulation protocol. (Note: On modern Cisco Catalyst switches like the 2960X/3850/9300, Dot1Q is the only supported encapsulation type, so this line might be omitted or rejected, but it's required on older switches that supported Cisco's legacy ISL protocol).switchport mode trunk: Forces the interface into permanent trunking mode.switchport trunk allowed vlan 10,20,30: Crucial security step! By default, a trunk port allows all VLANs (1through4094) across the link. Pruning unneeded VLANs prevents unnecessary broadcast traffic from traversing your trunk links and keeps isolated subnets secure.
Verifying Trunk Links
To verify that your trunk link is active and check which VLANs are allowed to cross, run:
Switch# show interface trunk
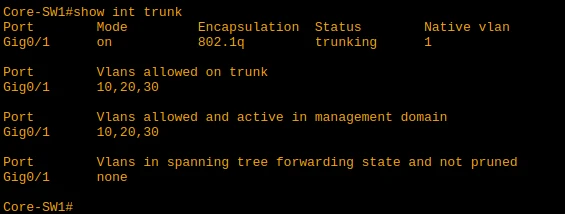
This output gives you instant visibility into the operational mode (trunking), encapsulation (802.1q), native VLAN ID, and the exact list of allowed VLANs actively forwarding.
The Native VLAN: Handling Untagged Traffic
Under normal operating conditions, every frame sent across a trunk link carries an 802.1Q tag. But what happens if a switch receives an untagged frame on a trunk interface?
To handle unexpected untagged frames, 802.1Q introduced the concept of a Native VLAN:
- Ingress Untagged: Any untagged frame received on a trunk port is automatically assigned to the trunk's configured Native VLAN.
- Egress Untagged: Any frame originating from the Native VLAN that exits a trunk port is sent without an 802.1Q tag.
Historically, this allowed switches to talk to legacy hubs or non-VLAN aware devices attached to a trunk link. While hubs are long gone, Native VLANs remain a core part of 802.1Q trunk operation—and a potential security threat if left unconfigured.
The Security Threat: VLAN 1 & Native VLAN Mismatches
By default, Cisco switches set VLAN 1 as both the default VLAN for all access ports and the default Native VLAN on all trunk links.
Leaving Native VLAN set to VLAN 1 poses a serious security risk called VLAN Hopping. Malicious actors can craft double-tagged 802.1Q frames from an access port in VLAN 1, tricking the switch into stripping the outer tag and hopping traffic straight into another secure VLAN without passing through a router!

The Native VLAN setting must match on both ends of a trunk link! If SW1 is set to Native VLAN 99 and SW2 is still set to Native VLAN 1, untagged traffic leaving SW1 on VLAN 99 will enter SW2 and be dumped directly into VLAN 1. This creates an unintentional bridge between two completely different subnets!
Cisco Discovery Protocol (CDP) will catch this mismatch instantly and spam console log alerts:
%CDP-4-NATIVE_VLAN_MISMATCH: Native VLAN mismatch discovered on GigabitEthernet0/1 (99), with SW2 GigabitEthernet0/1 (1).
- Security Best Practice: Always change the default Native VLAN on your trunk links to a dedicated, unused VLAN ID (such as
VLAN 99orVLAN 999) that has no active host devices or management interfaces assigned to it!
To change the Native VLAN on a trunk link:
Switch(config)# interface GigabitEthernet 0/1
Switch(config-if)# switchport trunk native vlan 99
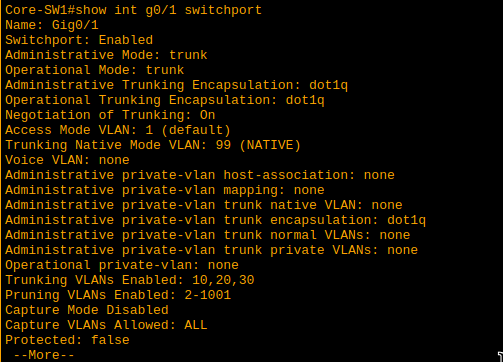
And verify your setting using:
Switch# show interface gigabitethernet 0/1 switchport
(Look for the line Trunking Native Mode VLAN: 99 in the output).
Voice VLANs: Two Networks, One Physical Port
In almost every modern corporate office, you'll find a VoIP desk phone sitting alongside a desktop PC.
Running two separate Ethernet drops from the IDF closet to every single desk is expensive. To solve this, Cisco IP phones feature an internal 3-port switch. The PC plugs directly into the back of the phone, and the phone plugs into the single Ethernet wall drop.

This creates a unique challenge:
- The PC's data traffic must live on the standard user data subnet (e.g., VLAN 10).
- The phone's VoIP traffic must live on a dedicated voice subnet (e.g., VLAN 150) so it can be prioritized with Quality of Service (QoS) to prevent choppy audio.
Instead of configuring a complex trunk port on the switch (which would expose all VLANs to the user's laptop NIC), Cisco IOS allows you to configure a Voice VLAN alongside your standard Access VLAN on a single switch interface!
Configuring a Voice VLAN
Here is the exact interface configuration for a dual-device desk port:
Switch# configure terminal
Switch(config)# interface FastEthernet 0/12
Switch(config-if)# description Desk 104 - PC & IP Phone
Switch(config-if)# switchport mode access
Switch(config-if)# switchport access vlan 10
Switch(config-if)# switchport voice vlan 150
Switch(config-if)# end
How this works in practice:
switchport mode access: Keeps the port operating safely in access mode.switchport access vlan 10: Assigns all untagged data originating from the PC to VLAN 10.switchport voice vlan 150: Tells the switch to communicate with the IP Phone using 802.1Q tagging on VLAN 150. The IP phone automatically tags its own voice packets with VLAN 150 while passing the PC's untagged data straight through!
Final Thoughts
VLANs are the fundamental cornerstone of modern enterprise network design. By breaking up massive broadcast domains into clean, isolated logical subnets, VLANs boost network efficiency, enforce security boundaries, and streamline traffic management. Mastering access ports, 802.1Q trunking, native VLAN security, and voice VLAN setups is essential whether you're studying for the CCNA 200-301 or building production infrastructure.
What's next on my study path? In the next article of this series, I'll be taking these VLAN boundaries and exploring Inter-VLAN Routing—specifically breaking down Router-on-a-Stick (ROAS) and Multilayer Switch SVIs!
How do you handle Native VLAN security in your home lab or enterprise environment? Do you use a dedicated blackhole VLAN or prune VLAN 1 entirely? Let me know in the comments or connect with me on LinkedIn!